
 Aktif Konular
  Üye Listesi
  Takvim
  Arama
Arama |
Aktif Konular Üye Listesi Takvim Arama |
| |
| Tayyareler | |
| |
  |
| Sayfa 2 Sonraki >> |
| Yazar | Mesaj |
|
Dr.BARKIN
Üye 

Kayıt Tarihi: 14/08/2007 Aktif Durum: Aktif Değil Gönderilenler: 264 |
  Konu: Ytaleri 1/72 F-22 Raptor Konu: Ytaleri 1/72 F-22 RaptorGönderim Zamanı: 24/09/2008 Saat 01:23 |
|
Ylk defa bir modeli bitirmeden resim koymayy ba?ardym...
önerileriniz? yorumlarynyz? 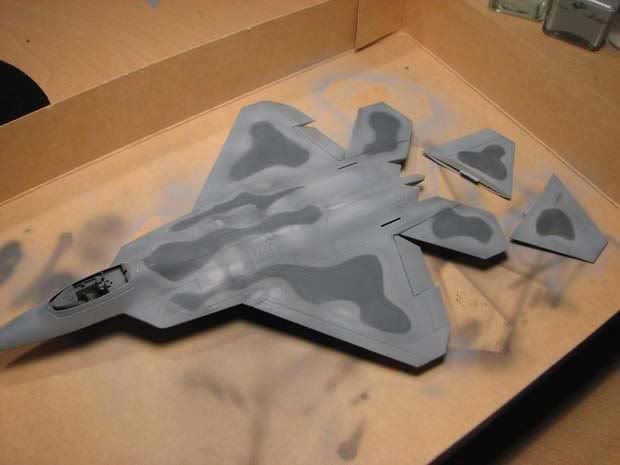 Düzenleyen Dr.BARKIN - 24/09/2008 Saat 01:25 |
|
|
mediiiiiic!
|
|
 |
|
|
nezih
Üye

Kayıt Tarihi: 02/09/2005 Aktif Durum: Aktif Değil Gönderilenler: 1077 |
Gönderim Zamanı: 25/09/2008 Saat 00:47 |
|
Kokpiti nekadar detaylandyrdynyz goremiyorum ama su an duzgun gidiyor... kolay gelsin.
|
|
|
Sweat saves blood!
|
|
|
|
|
|
Dr.BARKIN
Üye
Kayıt Tarihi: 14/08/2007 Aktif Durum: Aktif Değil Gönderilenler: 264 |
Gönderim Zamanı: 25/09/2008 Saat 03:52 |
|
kokpitle u?ra?myyorum ?imdilik
siyah-gri boyayyp geçiyorum |
|
|
mediiiiiic!
|
|
|
|
|
|
cnrabt
Üye
Kayıt Tarihi: 07/03/2006 Aktif Durum: Aktif Değil Gönderilenler: 107 |
Gönderim Zamanı: 25/09/2008 Saat 16:42 |
|
Zaten kokpitle u?ra?mak için artyk geç olmu? biraz gövde kapanmy? üzerinede kanopiyi kapayyn gitsin ancak 1/72 ölçek yüzünden mi u?ra?madynyz yoksa detaylar my u?ra?maya de?mez?
|
|
|
|
|
|
Dr.BARKIN
Üye
Kayıt Tarihi: 14/08/2007 Aktif Durum: Aktif Değil Gönderilenler: 264 |
Gönderim Zamanı: 25/09/2008 Saat 22:22 |
|
72 ölçekte dibine girmedikçe kanopi içi hiç gözükmüyor.
|
|
|
mediiiiiic!
|
|
|
|
|
|
rangerofsoul
Yeni Üye 

Kayıt Tarihi: 21/07/2008 Aktif Durum: Aktif Değil Gönderilenler: 53 |
Gönderim Zamanı: 26/09/2008 Saat 07:46 |
|
DR.Barkyn,
Gerçekten güzel gözüküyor. Ahh ahh bizimde pistoleli günlerimiz gelecek mi acaba diye iç geçirttiniz... |
|
|
|
|
|
Dr.BARKIN
Üye
Kayıt Tarihi: 14/08/2007 Aktif Durum: Aktif Değil Gönderilenler: 264 |
Gönderim Zamanı: 28/10/2008 Saat 00:08 |
|
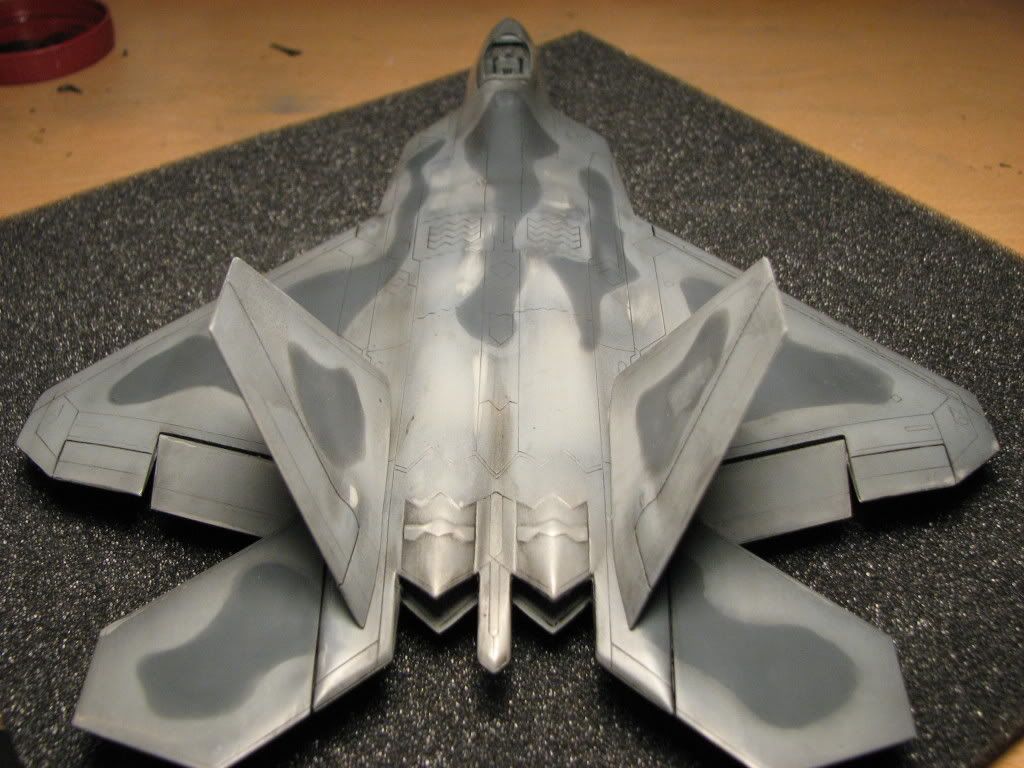
efendim boyamasy bitti, parlak vernik (x22) 2-3 kat atyldy. Hayatymda ilk defa ya?lyboya yykama yapyldy. Fena olmady. Ama tecrübe lazym :D

|
|
|
mediiiiiic!
|
|
|
|
|
|
wolf1
Üye

Kayıt Tarihi: 17/10/2005 Aktif Durum: Aktif Değil Gönderilenler: 175 |
Gönderim Zamanı: 28/10/2008 Saat 05:50 |
|
Detaylary çok güzel ortaya çykarmy?syn
|
|
|
|
|
|
Blackbird
Üye
Kayıt Tarihi: 17/09/2006 Aktif Durum: Aktif Değil Gönderilenler: 660 |
Gönderim Zamanı: 29/10/2008 Saat 13:59 |
|
Bazy yerlerde boya sökülmü? gibi sanki ?
Yine de kamuflaj ho? olmu? :) |
|
|
|
|
|
FB1907
Üye
Kayıt Tarihi: 29/01/2008 Aktif Durum: Aktif Değil Gönderilenler: 116 |
Gönderim Zamanı: 29/10/2008 Saat 16:51 |
|
emeginize saglyk gayet güzel gözüküyor.
|
|
|
|
|
|
Dr.BARKIN
Üye
Kayıt Tarihi: 14/08/2007 Aktif Durum: Aktif Değil Gönderilenler: 264 |
Gönderim Zamanı: 31/10/2008 Saat 18:16 |
|
Orjinalini yazan: Blackbird
Bazy yerlerde boya sökülmü? gibi sanki ? Yine de kamuflaj ho? olmu? :) Ynce su zymparasy ile renkleri "blend" ederken fazla abanynca boyayy tamamen uçurdu?um yerler oldu gerçekten de. Ama çok dert etmedim. Müdahale etmeyi de artyk dü?ünmüyorum. Gerçek gözle bakynca uzaktan güzel görünüyolar çünkü. Solmu? veya yypranmy? gibi. Ama bir dahaki sefere elimin ayaryny kaçyrmam umarym :D |
|
|
mediiiiiic!
|
|
|
|
|
|
Ares
Admin Group 

Kayıt Tarihi: 04/01/2005 Aktif Durum: Aktif Değil Gönderilenler: 3654 |
Gönderim Zamanı: 31/10/2008 Saat 19:29 |
|
Orjinalini yazan: Dr.BARKIN
Orjinalini yazan: Blackbird
Bazy yerlerde boya sökülmü? gibi sanki ? Yine de kamuflaj ho? olmu? :) Ynce su zymparasy ile renkleri "blend" ederken fazla abanynca boyayy tamamen uçurdu?um yerler oldu gerçekten de. Ama çok dert etmedim. Müdahale etmeyi de artyk dü?ünmüyorum. Gerçek gözle bakynca uzaktan güzel görünüyolar çünkü. Solmu? veya yypranmy? gibi. Ama bir dahaki sefere elimin ayaryny kaçyrmam umarym :D Boya dökülmesi ve solmayy yapty?ynyz uça?yn syrf o boyasy nedeniyle sayfalarca makaleye konu olmu? olan F-22 oldu?unu nacizane hatyrlatyrym. |
|
|
Ares
If you're in a fair fight, you didn't plan it properly... |
|
|
|
|
|
Dr.BARKIN
Üye
Kayıt Tarihi: 14/08/2007 Aktif Durum: Aktif Değil Gönderilenler: 264 |
Gönderim Zamanı: 01/11/2008 Saat 04:05 |
|
ne demek istedi?inizi anlayamadym
|
|
|
mediiiiiic!
|
|
|
|
|
|
Ares
Admin Group
Kayıt Tarihi: 04/01/2005 Aktif Durum: Aktif Değil Gönderilenler: 3654 |
Gönderim Zamanı: 01/11/2008 Saat 04:34 |
|
Anlatayym;
Öncelikle Sr-71de kysmen denenmi? olan bu özel boya syrasyyla F-117 geli?tirilmi? akabinde B2 ve F-22'ye uygulanmy?tyr. Özelli?i yapysyndan dolayy radar dalgalaryny kysmen absorbe etmesidir. B2 ve F-22de bu boyayla yetinilmemi? üstüne bu özelli?i arttyracak birde micron tadynda film katmany atylmy?tyr. Bu katman günümüz modern sava? uçaklarynyn ço?una uygulanmaktadyr. Bu film tabakasy ve özel boya kombinasyonu F-22nin rengine di?er uçaklarda olmayan bir karakteristik eklemi?tir. Model firmalarynyn verdi?i ve foto?raflaryn genelinde görüldü?ünün aksine bu renk direkt gri olmayyp içinde hafif bir metalik mavi ta?ymaktadyr tint tabir edilebilen. F-22'nin kazara boyasy kenaryndan 2 milim dökülse yada soyulsa o uça?y direkt servisten boyahaneye çekerler kysmi stealth özelli?ini kaybedece?i için. Bu nedenle panel arasy kirleri postshade le modele uygulayabilmenize kar?y bu uça?a yypranmy? etkisi vermeniz modelcilik açysyndan gerçe?i yansytmaz. Solma konusu ise ayryeten incelenmesi gereken bir husus keza F-22 servise gireli ne kadar oldu, yerdeyken nasyl muhafaza ediliyor gibi konulary incelemek gerekir. |
|
|
Ares
If you're in a fair fight, you didn't plan it properly... |
|
|
|
|
|
Dr.BARKIN
Üye
Kayıt Tarihi: 14/08/2007 Aktif Durum: Aktif Değil Gönderilenler: 264 |
Gönderim Zamanı: 01/11/2008 Saat 08:24 |
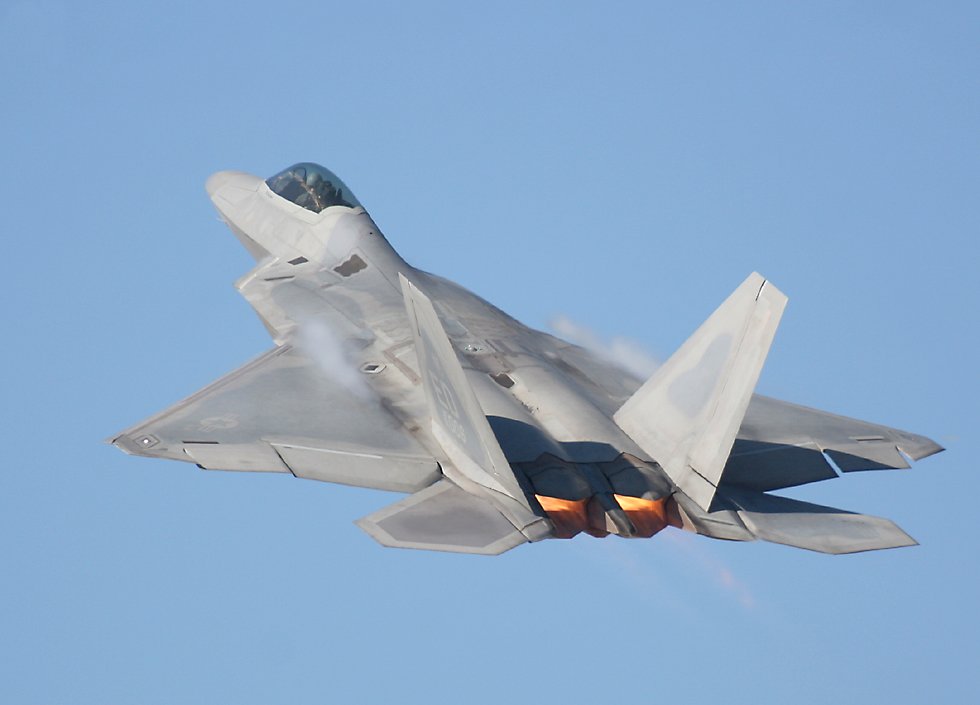
Aslynda boyasynda oldukça yypranma var gibi duruyor birçok fotoda. Mesela bu fotoda üst gövde... |
|
|
mediiiiiic!
|
|
|
|
|
|
Ares
Admin Group
Kayıt Tarihi: 04/01/2005 Aktif Durum: Aktif Değil Gönderilenler: 3654 |
Gönderim Zamanı: 01/11/2008 Saat 13:08 |
|
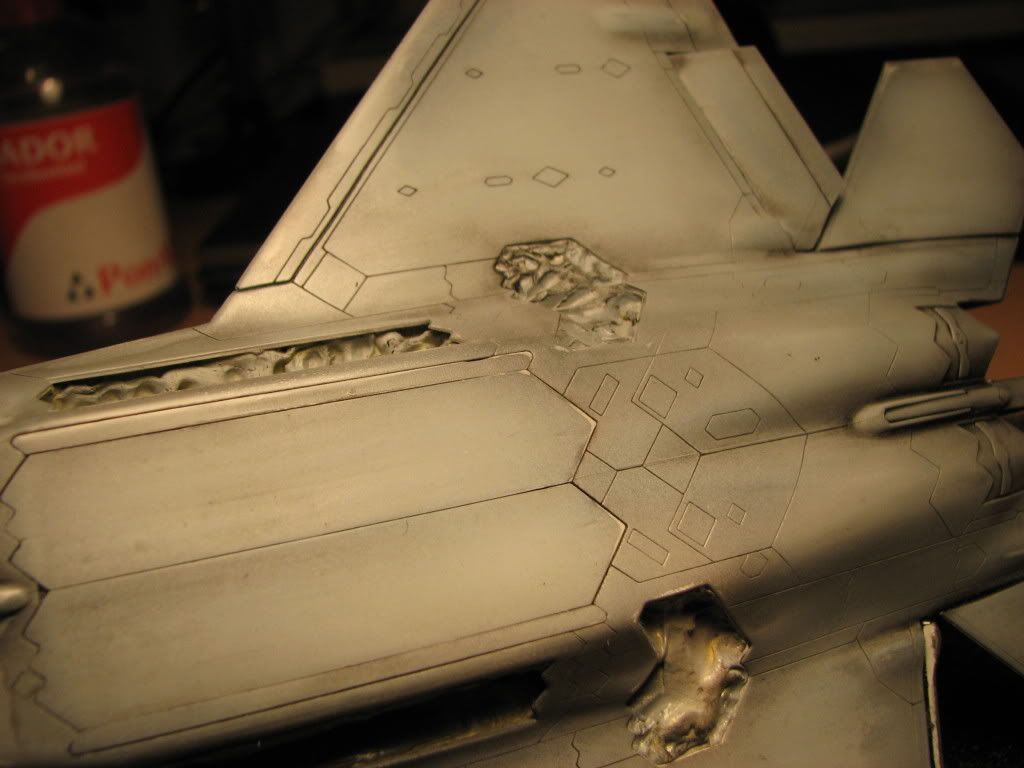
Yypranma ile kirlenmeyi kary?tyryyorsunuz, basty?ynyz foto?rafta yypranma yok, kirlenme var. Öte yandan ?öyle bir senaryo yazsak; sene 2045, sava?acak dü?man kalmamy?, F-22 artyk emektar eski jenerasyon bir atmosfer uça?y olmu?, mevcut yeni jenerasyon avcylar arzda fezada uçmakta F-22ler son demlerini ya?amakta 10 senedirde kimse boyaysyyla vs ilgilenmemekte haliyle boyalar yer yer dökülmeye ba?lamy?. Bu noktada dökülen boyanyn altyndan ilk olarak çykacak renk astar rengidir.
F-22'nin astar rengi için; 
Bu da boyama a?amasyndan bir foto, nette bir yerde daha büyü?ü vardy foto?rafyn ama bulamadym henüz. 
Daha da abartyp sene 2065 diyelim, uçaklar hala mucizevi bir ?ekilde uçmakta ama astar boya bile da?ylmy? gitmi?, o zaman altyndan altyndan çykacak renk kullanylan kompzitin rengidir. F-22'nin boyasyny do?ru yapabilmek için en kapsamly modelcilik yazylaryndan biri a?a?ydadyr. The real challenge in building a model of the F-22 is duplicating the metallic sheen of its camouflage coating. As you can see from the photos, the coating can appear lighter or darker than the gray radome or other painted areas, depending on the sun angle. After getting used to Metalizer and Alcad II paints over the years, the prospect of spraying silver enamel was so daunting that I: 1) cleaned my study, 2) dusted my models, and 3) did my taxes to avoid painting the silver coats for as long as possible. Once I actually started, it only took about an hour from starting the first coat to being finished. (Of course, the masking leading up to the painting was a multi-night effort). Mark S., ARC poster, the owner of an engineering firm with experience in automotive paint (not to mention Wolfpak Decals and the upcoming Spectre Accessories), developed the following technique that I used on my model. Based on his experience in the paint business, he believes that the formulation of Model Master enamels provide the best match of the metallic gray colors of the F-22 scheme. This gets into the optical physics of the paint that, if you were exposed to, you’d probably want to kill yourself (it is better to eat sausage in ignorance than watch it being prepared)! Anyway, after a bit of back and forth, what follows is Mark’s process, with some touches I added as well. 1) Paint the leading edges of the flaps, ailerons, rudders, canopy frame, radome, and other hard-edged gray patches FSN 36375 light ghost gray (Testors 1728). [Other guesses for this color include FSN 36440 Light Gull Gray or FSN 36251 Navy Aggressor Gray—take your pick.] After allowing them to dry thoroughly, mask over prior to applying the “metallic” camouflage. 2) If desired, pre-shade selected areas dark gray. I got a LOT of questions about this at my local club. What I did after the Light Ghost Gray was thoroughly dry was to refer to photos and sketch the pattern of the darker silver gray pattern on the model. I then sprayed this pattern Gunship Gray (36118), not bothering to make it a solid coat. I then made a photocopy of the top of the fuselage, horizontal tails, and both sides of the vertical tails. I cut out the dark parts of these copies to make masks that were used after the light metallic silver had been applied. 3) The metallic grays are mix of Testors Model Master automotive enamels. The light metallic gray is 4 parts Aluminum (1781) to 1 part of Graphite Metallic (2712); the dark metallic gray is 1 part Aluminum and 3 parts Graphite Metallic. These colors must be shaken frequently to keep the colors mixed. As you spray, the thinner in the dark metallic gray will re-melt the light metallic gray coat, causing the two to blend better. Since they are NOT Metalizer paints, using any sort of adhesive masking on them will be a recipe for disaster. [Late breaking news: This is UNTESTED, but Mark advises that adding a tiny amount (a drop or two) of Testor's Gun Metal (1795) into the light metallic gray mixture to tint it slightly MAY improve the look of the coating even more.] 4) First spray two coats of normally thinned light metallic gray to give a rich color. Immediately after the second coat is dry to the touch, start spraying a somewhat thinned mix of the dark metallic gray, not sprayed to complete density of the color so the coat is thin and translucent. You do not want to cover over the light silver entirely. Because all the wing edges are masked, it was easy to loosely tape the masks I had made to the edges of the model without masking the just sprayed light color. This greatly simplified the painting task and was well worth the minimal effort required. It also made possible the consistent and well-defined, yet soft edges I achieved. Once finished, allow the model to dry thoroughly for a few days. 5) Although you can wait until the end, you’ll probably be busting to unmask everything but the canopy here—go ahead. 6) Apply decals after the overcoat has dried thoroughly. If you haven’t already, you’ll need to unmask the tails and apply Future to the tips before applying the squadron fin flashes Another (un-tinted) clear overcoat here is optional to hide decal film. 7) A final flat finish, such as Testors Dullcote (1160X), should be applied to even out the finish. You are not going to want to do this because it looks so cool the way it is, but don’t fear, the metallic sheen will remain. To convince myself, I sprayed the bottom of one of the horizontal tails first as a test. Link |
|
|
Ares
If you're in a fair fight, you didn't plan it properly... |
|
|
|
|
|
***Maketci***
Yeni Üye
Kayıt Tarihi: 01/11/2008 Konum: Turkey Aktif Durum: Aktif Değil Gönderilenler: 1 |
Gönderim Zamanı: 01/11/2008 Saat 14:41 |
|
Arkada?ym gerçekten Maketin Çok Güzel Gidiyor ama Ke?ke Kamuflajy Biraz daha iyi atsaydyn yani Simetrik atsaydyn ozaman Kamuflaj daha düzgün dururdu ama Ben Çok Be?endim Gene Duygularym kabardy sanyrym 2 yyldyr beni bekleyen f-104 ümün ba?yna dönmeliyim :) Ama Çok so?udum f-104 lerden :(
|
|
|
|
|
|
Blackbird
Üye
Kayıt Tarihi: 17/09/2006 Aktif Durum: Aktif Değil Gönderilenler: 660 |
Gönderim Zamanı: 01/11/2008 Saat 18:35 |
|
Eheh.
|
|
|
|
|
| Sayfa 2 Sonraki >> |
| |
||
Forum Atla |
Kapalı Foruma Yeni Konu Gönderme Kapalı Forumdaki Konulara Cevap Yazma Kapalı Forumda Cevapları Silme Kapalı Forumdaki Cevapları Düzenleme Kapalı Forumda Anket Açma Kapalı Forumda Anketlerde Oy Kullanma |
|
